Read First
Beginner’s Guide To Horse Training: Part 1
Early experiences have a tremendous influence on the horse training, as well as laying the psychological foundation for subsequent training. From the moment a foal is born, his sensory systems pick up information from the environment, interpret the data received, and store it, in an as yet unknown fashion, as memory. Most horsemen attest that the equine memory is phenomenal.
Actually, this memory is probably more a result of the habit-forming behavior of the horse and his general shyness, than of any extraordinary psychological capability.
The horse’s ability to form and retain habits enables humans to successfully train him, but it’s also the cause of a great deal of frustration during training, for the habits or responses formed in a particular situation are often not the ones the trainer desires. Bad habits are formed as readily—if not more readily—than good ones in the horse, because bad habits usually result from the horse responding out of fear. Reducing fear is a highly motivating force in horse training.
If the horse’s response to an aid decreases his fear or eliminates the object that frightens him, this reduction in fear strongly reinforces the response in his mind. Thus, the probability of a similar response occurring the next time the situation arises is very high.
People often spend hours teaching their horses to load and ride quietly but forget that unloading is just as important a part of a safe trip. What this example points out is that the first few experiences a horse has in any phase of handling or training will greatly influence the eventual behavior exhibited by the horse in that situation.
This is true not only for specific responses such as loading or unloading from a trailer, but for general attitudes toward training, and trainers, as well. Good trainers try to develop a horse’s confidence because this confidence (both in the trainer and in his own abilities) reduces a horse’s fear, and a reduction of fear always strongly reinforces a response.
Confidence building or reducing should begin as soon as possible after the foal is born. Quiet, deliberate, gentle handling at birth is a good beginning for any foal and should be practiced throughout his early life.
Once a horse is assured of his physical superiority to the trainer there is no basis for respect, and the very foundation of the relationship between horse and man crumbles. First and foremost the horse must obey. True, unquestioning obedience comes through a respect for and confidence in the trainer. One of the most dramatic and important lessons a young horse can learn is the supremacy of man.
A very effective way to teach this lesson early is simply to place your arms around a young foal and hold him firmly for a few minutes. He’ll struggle to get loose, but if the trainer has one arm around his hips and the other around his chest he can maintain the physical advantage and keep the foal from getting away—imperative if the lesson is to work.
After a few minutes of struggling, the foal, realizing that he’s getting nowhere, stops. The foal has learned his first major lesson—that man is physically superior—but also that he wasn’t hurt by the whole affair.
Halter Breaking
Halter breaking can be one of the most traumatic experiences in a horse’s life and horse training if left until weaning or later.
It usually ends as a battle between horse and man and requires a good deal of physical effort on the part of the trainer involved. A much better approach, from a physical as well as psychological viewpoint, is to begin halter breaking shortly after foaling. Put a proper size halter on the foal a few days after birth and let him wear it while in a stall or paddock where he can be watched.
It’s dangerous to turn a foal loose in a large area with a halter on because of his chance of injuring himself on a fence or some other object in the pasture. Haltering lessons should be repeated daily with lots of taking the halter off and putting it on again. Always halter the foal in the same manner—remember, we’re trying to teach him the respect and confidence that come through thoroughly repeating each lesson.
Approach the foal from the near (left) side; place your right hand on his croup and slide it up toward the neck on the off (right) side. Hold the halter in your left hand by the unbuckled crown piece. As you move your right hand up along the neck talk reassuringly to the horse until you’re standing just behind his throatlatch with your right arm over his neck. Pass the halter under his throatlatch and grab the crown piece with your right hand, holding the buckle of the left cheek piece in your left hand.
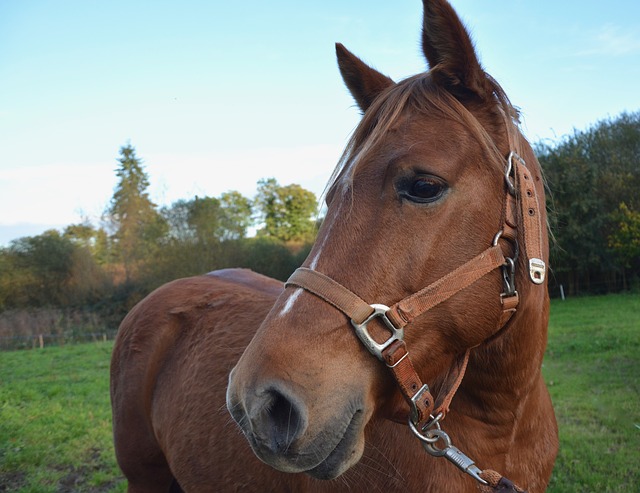
Move both hands slowly forward until you can slip the nose piece over the foal’s nose and pull the halter up into place to buckle it. Remember to use the same procedure for haltering the foal every time. Not only is he learning to wear the halter without fear, he’s also learning that every time the trainer follows this routine a halter is put on.
Don’t ever begin to halter a foal (or any horse, for that matter) and then not finish the job. This lets the foal know that you’re not consistent in your behavior. Consequently, the foal may begin to experiment to see what responses he can make to keep you from haltering him again.
Most horses that are hard to catch and halter simply weren’t taught properly in the first place. Horses may not have great reasoning powers but they are keenly observant and take advantage of any inconsistencies on the trainer’s part to make things easier on themselves.
Once the trainer is able to halter the foal without problems and the foal wears the halter quietly, it’s time to teach the foal to respond to pressure on the halter. If the foal is halter broken while still suckling, these lessons can begin by having someone lead the haltered foal behind its mother.
Usually the desire to follow its mother is enough impetus to keep the foal moving, but if not, a rump rope or come-a-long can be used. This is simply a loop of rope placed behind the foal’s hindquarters with which the handler applies pressure, in addition to the halter pressure, to encourage the foal to move forword. This is the young horse’s first serious introduction to escape and avoidance conditioning.
Attitudes formed at this time influence subsequent training. If the foal learns to resist the trainer’s demands successfully at this stage, he’s well on the way to becoming a problem horse.
The halter lesson with the foal demonstrates the transition. The first time the handler applies pressure on the halter to get the foal to move forward, the foal usually struggles to get away from the new sensation.
He may be frightened and pull backward or jump sideways to escape the pressure. When this fails, he moves forward, perhaps only slightly. It’s imperative that any indication of forward movement be instantly rewarded by releasing the pressure on the halter. This release reinforces the response; and it must be contingent on the response for effective learning to occur.
Repeating the procedure a few times normally results in the foal moving forward when halter pressure is applied, provided the pressure is released and not re-applied as long as the foal moves forward satisfactorily.
Don’t be impatient or expect too much too soon.Horse training takes time. Reward correct responses with petting and kind words in addition to releasing the pressure. At this point the foal has learned an escape response. He moves to get away from the pressure of the halter.
Some people go no further than this in halter-breaking foals, perhaps because they don’t realize they can. But the problem with stopping here is that the adverse property of the stimulus decreases with time and habituation.
The slight halter pressure which once startled and motivated the foal won’t cause much of a stir as the horse matures, and stronger and stronger pressure is needed to effect the desired response. To avoid this, the trainer can switch to avoidance conditioning as soon as the escape response is learned.
This involves the introduction of a neutral cue just prior to the old pressure stimulus. This neutral cue can be a vocal one such as the command to “walk” or a visual one such as the trainer moving forward slightly just before applying halter pressure. If the same new cue is presented every time, just prior to the old adverse stimulus, the horse eventually learns to respond to it in order to avoid the old stimulus.
Thus we have a horse that moves off on command without any pressure applied to the halter, a much easier situation for both trainer and horse. Once the avoidance response has been learned, the old adverse stimulus of halter pressure is used only when the new cue fails to obtain the cornet response.
When we want the horse to stop we employ a neutral cue, such as the voice command, “Whoa,” or a visual cue such as turning slightly to face the horse, followed by the adverse stimulus of applying pressure on the nose band of the halter by pulling the lead rope backward.
A trained horse shouldn’t have to escape the rider’s cues, he should respond to neutral cues that he knows allow him to avoid adverse stimuli. Positive reinforcement, in the form of a soothing voice, petting, or better yet, the end of work, will serve to enhance the learning process even more.
In halter breaking a horse, we are not only concerned with teaching the horse to move forward and stop on cue, but we must also teach the horse to stand quietly when tied. In reality, the horse teaches himself to do this, but the trainer helps make the lesson more effective (as well as safer) by taking a few precautions. The equipment used to tie a horse should always be strong.
He should be tied to something stout, such as a fence pole sunk in the ground, but never fence planking. It’s a good idea to wrap an inner tube around the pole the horse is tied to for the first few lessons. This provides the lead rope with some elasticity and prevents neck strain if the horse pulls back and fights the rope.
The rope should be tied short and at the horse’s eye level if possible. Tying short lessens the chance of the horse becoming tangled in the rope, and tying high offers further prevention against neck strain. Also, some type of quick-release knot should be used to tie the horse in case of an emergency.
Once the horse stands quietly when tied, the trainer should begin grooming the horse to accustom him to being worked around while tied. These lessons should include a lot of work with the legs and feet, picking each foot up several times during every lesson. Even after the horse stands while tied, the trainer should never make the mistake of using weak equipment or tying the horse to something flimsy.
The horse may spook at any number of things which could cause him to pull back. If he’s successful in getting loose by pulling back once, he’s very likely to try pulling back every time he’s tied. It’s best to tie a horse correctly every time not only to prevent injury but to avoid the potential damage incorrect tying can have on the learning process. Longeing One of the best means of teaching obedience as well as developing confidence and suppleness in the young horse is through longeing.
A longe is simply a line about thirty feet in length, made of soft cotton rope, webbing, or nylon which the trainer attaches to the horse’s halter or longe cavesson (a type of reinforced halter with noseband rings especially designed for longeing). The trainer plays out the longe line as the horse moves in a circle around him. A great deal can be taught to a horse on the end of a longe line.
Not simply basic exercises such as trotting or stopping on command, but more advanced training such as basic dressage and jumping. But perhaps the greatest benefit of longeing is that it allows the horse’s training to progress even when he is still too young physically and mentally to carry a rider. If we remember the basic principles of learning, it is easy to teach a young horse to longe properly.
Training on the longe line can begin somewhere around nine months of age, assuming the foal is well halter-broken. It’s important to remember at this stage, however, that the foal is an immature animal who cannot accept too much physical or mental stress without some ill effects.
Early lessons on the longe line should be limited to fifteen minutes at the very most and the horse’s gait should be restricted to a walk. Having two people available to teach the longe lessons speeds up the learning process, but one person can teach a horse to longe effectively, although a bit more time and patience may be required for a really good performance.
It’s best to conduct the lessons in an enclosed area such as a round pen, small paddock or large box stall, especially if the trainer has no assistant. If two people are available for the job, one should be at the horse’s head and the other should be in the center of the circle holding the end of the longe line.
Initially, the circle should be small, both to control the young horse and to make sure he focuses his attention on the trainer’s commands. The horse is led by the assistant walking on the outside of the circle with the horse between himself and the trainer.
Some attention should be given to proper longeing techniques before we explain this procedure further. In riding we utilize several types of aids, both natural (legs, hands, weight) and artificial (spurs, whip, martingale) to shape the performance of the horse. In longeing, however, we lose this physical closeness, and consequently most of these aids. We must develop other means of acquiring the responses we want.
If we look at these aids as learning stimuli, we realize that most riding aids rely on tactile stimulation. But in teaching the horse to longe we must introduce different types of stimuli to replace those we use in riding.
As we said earlier, longeing is an excellent means of teaching obedience in the young horse, but unfortunately many people don’t understand that the methods and procedures used to teach the horse to longe must stress consistency and contingency, just as any other training must.
Trainers often allow a horse to perform poorly when longeing—making irregular circles and failing to respond to commands—without realizing that each time a trainer demands a response and the horse, by whatever means, gets away without responding, the basis for respect and obedience in all phases of training is undermined. This doesn’t imply that there is always a battle of wills between trainer and horse, however!
If properly taught from the beginning, longeing is a rewarding and relaxing experience for both horse and trainer because the horse knows exactly what is expected of him and has confidence in the consistency and fairness of the trainer.
As long as he responds to the trainer’s demands as best he can he is never unjustly punished and often receives positive encouragement in the form of a soothing voice, petting, a favorite tidbit, or a rest period. Only when he refuses to obey or responds half-heartedly does the trainer reprimand him. The punishment is always in keeping with the crime and is never inflicted out of anger or frustration on the trainer’s part.
The reader should realize immediately that if this kind of solid, intelligent longe training foundation is laid before any attempt is made to ride the horse, the breaking and training period go much more smoothly, and learning on the horse’s part is fairly rapid. Naturally, trainers are only human and all of us make mistakes in judgment when working with horses, particularly if the horse is very high-strung or very stubborn.
Naturally, as with most aspects of horse training, there are several ways to teach a horse to longe. The method described here has been very effective for a large number of trainers (the author included) and, more importantly, seems to be effective with the majority of horses. In the first longeing lesson the horse makes a small circle at a walk around the trainer who pivots in one spot in the center of the circle.
If an assistant is available, he leads the horse from the outside of the circle. If the trainer is alone, he must lead the horse around by himself in a small circle, playing out the line slowly as the horse begins to understand what is expected of him. The position of the trainer’s body in relation to the horse is very important in these longeing lessons. The trainer’s body position along with the voice and whip provides the driving force to keep the petting, a favorite tidbit, or a rest period.
Only when he refuses to obey or responds half-heartedly does the trainer reprimand him. The punishment is always in keeping with the crime and is never inflicted out of anger or frustration on the trainer’s part.
The reader should realize immediately that if this kind of solid, intelligent longe training foundation is laid before any attempt is made to ride the horse, the breaking and training period go much more smoothly, and learning on the horse’s part is fairly rapid.
In the first longeing lesson the horse makes a small circle at a walk around the trainer who pivots in one spot in the center of the circle. If an assistant is available, he leads the horse from the outside of the circle.
If the trainer is alone, he must lead the horse around by himself in a small circle, playing out the line slowly as the horse begins to understand what is expected of him. The position of the trainer’s body in relation to the horse is very important in these longeing lessons. The trainer’s body position along with the voice and whip provides the driving force to keep the properly halter-broken.
A horse can’t be expected to respond well in an advanced procedure if he hasn’t learned the elementary one yet. Secondly, longeing is an elementary lesson in itself, a step towards more advanced work. One of the basic lessons of longeing is to teach the horse to respond to driving aids by moving forward in a balanced, relaxed manner.
Until the horse does this, we cannot hope to teach him long-reining or driving, preliminary lessons to mounted work. Without this, the initial mounted lessons are much more frustrating and difficult for both horse and rider. Once the horse has learned to move quietly on a circle around the trainer, it’s time to teach the horse to stop on the circle on command.
Again, if the early lessons in halter breaking were through this shouldn’t be difficult. If a voice cue such as whoa was used to stop the horse during halter breaking the same cue can be used effectively in longeing. It may also be combined with a visual cue such as the trainer moving out of the driving position toward the horse’s head. The cue or cues used are not so important as the consistency of their application.
At this point it’s probably a good idea to talk about some of the problems that may arise during these early lessons because training rarely goes exactly according to the book. One common problem is the horse’s failure to make round circles. He may cut corners or try to pull away from the circle if he’s not in an enclosed area.
Teaching the initial lessons in a fenced ring greatly lessens these problems, but if no ring is available, the corner of a paddock at least offers some boundary. Using a longe whip helps prevent the horse from cutting corners. As he comes in on the circle the whip should be flicked at his shoulder until he moves back into a proper circle.
If he tries to pull out of the circle, the trainer should brace himself against the longe line, increasing the pressure on the halter or cavesson until the horse moves back onto the circle, at which time the line should go somewhat slack again. The other major problem encountered in these early lessons is caused by faulty position of the trainer.
If he gets out of his driving position (eyes focused on the horse’s hip) and turns toward the horse’s head, the horse will almost invariably stop and face the trainer. This is simply another example of the horse’s basic nature: he won’t do more than is asked—a trait certainly not restricted to equines.
He moves forward in response to the cue presented by the trainer’s position; if that changes, the response usually ceases, especially in the early acquisition phase of learning to longe. Assuming the horse is longeing quietly at a walk in both directions, starting and stopping on command, and that any problems up to this point have been overcome, we’re ready to ask for a trot.
Sound judgment must be used to decide whether a young horse is physically up to longeing at a trot. Your best advice here comes from your veterinarian, who can examine the horse for structural soundness and evaluate how much physical stress the horse can tolerate at this stage without ill effect.
If your vet gives you the go-ahead, you can introduce a few circles at a trot at the end of a regular longeing session. Use some neutral cue (voice cues such as “Trot” are especially effective) to signal to the horse that a new response is desired. Reinforce the cue with the whip, either pointing it at the horse’s hip, or, if necessary, popping it in the direction of his lower hind legs.
Only in rare cases is it necessary to actually strike the horse with the whip. The cues cease as soon as the horse begins trotting and are re-applied only if he slows to a walk again. Two or three circles at a trot are sufficient for the first lesson, after which the horse is allowed to relax and return to its stall or paddock.
These lessons are repeated until the average fifteen-minute longe session includes ten minutes of work at a walk and five minutes at a trot, with trotting and walking sequences alternated to avoid the stress of a long trotting period. Numerous stops, both from a walk and a trot are interspersed throughout the lesson and several changes of direction at both gaits are demanded.
Longeing at a canter or lope shouldn’t be taught at this time. The physical stress is too much to ask the young horse to bear right now, and there is little that can be taught at a canter that can’t be taught at a walk or trot. In addition, the faster gaits are naturally more exciting to the young horse, and may only foster new problems if speed is introduced too early in the training program.
Longeing at a lope or canter is introduced at a later stage in the breaking period when our control over the young horse is more complete. By this point the young horse is probably into his second year and approaching the breaking period which includes saddling, bridling, bitting, ground driving and the initial mounted work.
A solid physical and mental foundation for further training has been laid on our young horse. He is obedient but good-natured and approaches his training sessions as matter-of-factly as his own disposition allows.
He has confidence in and respect for his trainer and is developing the boldness and eagerness which comes from having confidence in his own ability to do what the trainer asks.